Home
>
Airgun Rendezvous Main Forum
>
Topic
308 Airgun Build Continues.... slowly (pic heavy)
|
308 Airgun Build Continues.... slowly (pic heavy) November 02, 2019 06:40PM |
|
Registered: 14 years ago Posts: 1,097 |
I was finally able to make some time to continue on the 308 Airgun I have wanted to build. The design is based on the 45 Texan by AirForce Airguns. I am working from pictures I found online and from someone who had pics from a 45 Texan dismantled. Started this over 2 years ago, worked out most of the mechanisms on CAD (computer aided design). The concept is rather intricate the way all the components relate, the reverse thinking of most air rifles when it comes to the hammer.
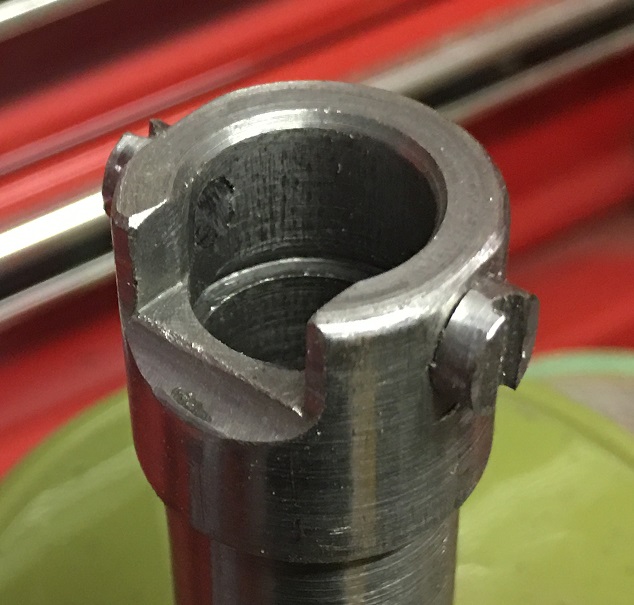
One of the issues I was having is the cocking. It had become hard to move the components in the tube. Found the reason to be the screws I used on the breech. Now these screws are meant only to move things back and forth, act as a stop. I suspected that my slot wasn't long enough so when the hammer was released, the hammer hit the breech, which in turn hits the valve, but the screws bottomed out before the entire stroke of the breech/valve.
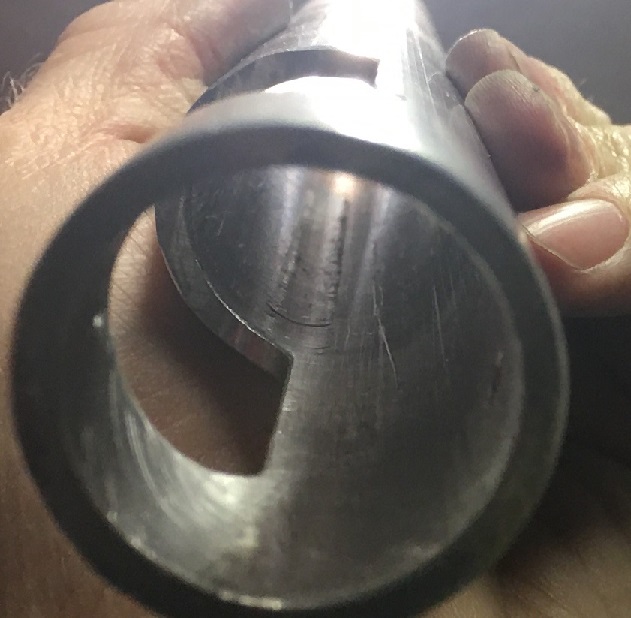
Screw heads scored the inside of the aluminum tube.
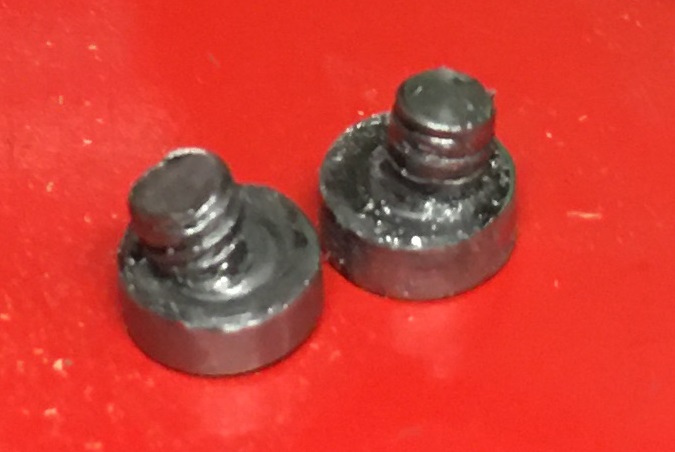
I lathed, tapped, slotted the head and filed the screws to the right size. Finally heat treat and tempering.
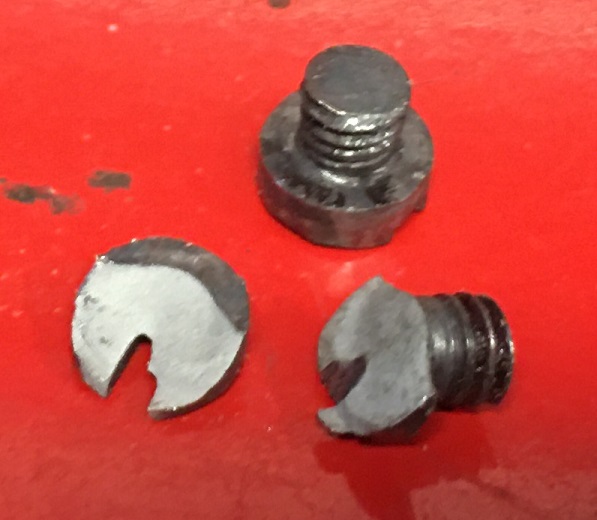
I had to fit parts a few times and when one screw was tightened, snap! Guess the temper was off. Cracked the top off.
At this point I gave up, was 8:30 pm, Friday night.
Back at it this morning and made a new screw.
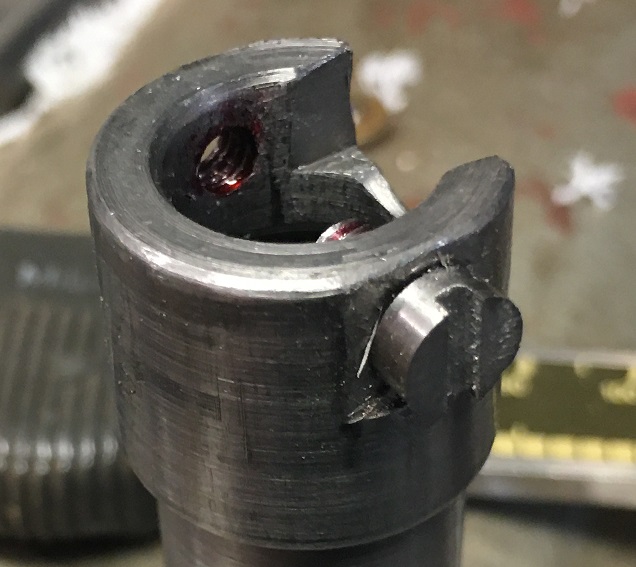
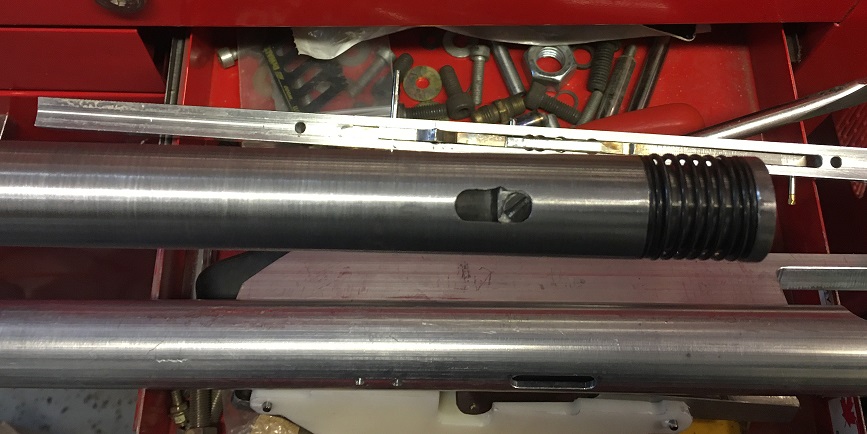
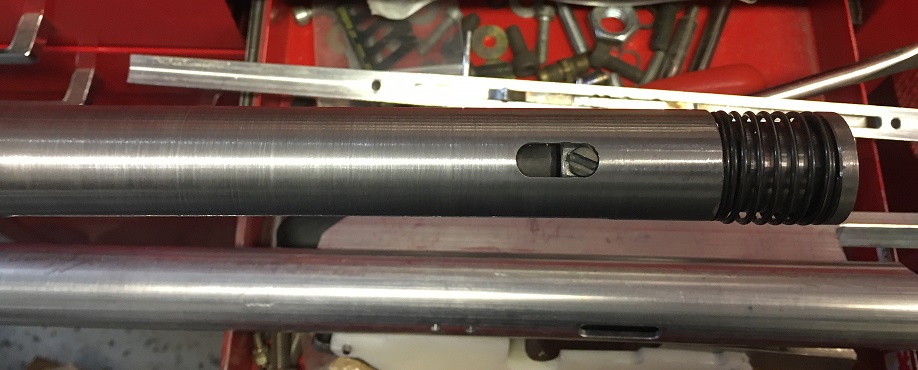
The tube where the hammer, springs, and breech reside in, the slots where lengthened by 0.125" one way and .050" the other. This should keep the breech screws from bottoming out when the hammer strikes.
Now to see how far the valve opens it is impossible to see with the naked eye. iphone has a slow-mo feature and it actually worked. One frame caught the valve opening as far as it could at 2000psi. Note the red arrows. Closed and open gaps.
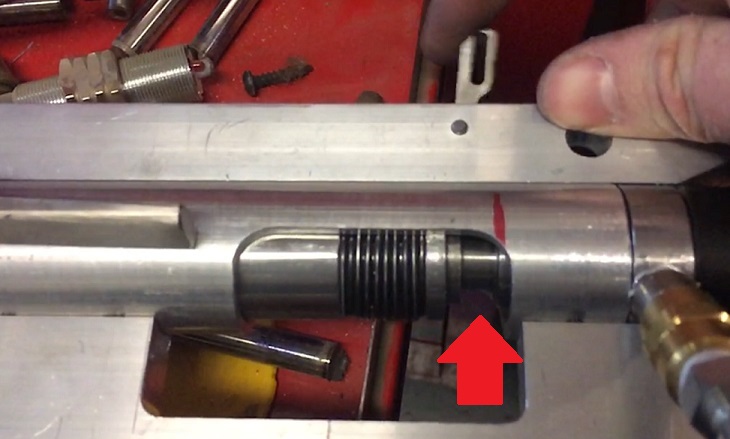
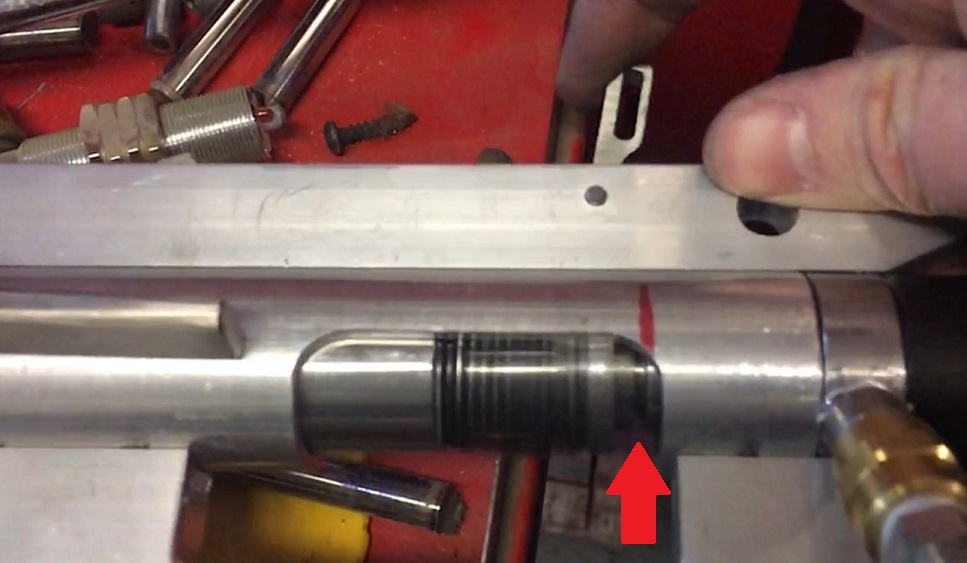
So the valve travels rather far, but will decrease with more PSI in the tank. Least I can move on now to fitting more parts. Still so much to do on the build but will slowly get there. Mounting the barrel will not be easy as a rather thin wall barrel. Have to be careful not to distort the diameter in anyway to jeopardize the projectile traveling through.
Looking forward to actually firing the rifle assembled and complete but still a few months away.
(Edited)
Searched through the posts, here are links to the previous build posts.
[www.airgunrendezvous.com]
[www.airgunrendezvous.com]
[www.airgunrendezvous.com]
[www.airgunrendezvous.com]
Might be more, but all I had time for now.
Thanks for reading.
Pedro G.
Edited 1 time(s). Last edit at 11/02/2019 07:00PM by pedrog.
One of the issues I was having is the cocking. It had become hard to move the components in the tube. Found the reason to be the screws I used on the breech. Now these screws are meant only to move things back and forth, act as a stop. I suspected that my slot wasn't long enough so when the hammer was released, the hammer hit the breech, which in turn hits the valve, but the screws bottomed out before the entire stroke of the breech/valve.
Screw heads scored the inside of the aluminum tube.
I lathed, tapped, slotted the head and filed the screws to the right size. Finally heat treat and tempering.
I had to fit parts a few times and when one screw was tightened, snap! Guess the temper was off. Cracked the top off.
At this point I gave up, was 8:30 pm, Friday night.
Back at it this morning and made a new screw.
The tube where the hammer, springs, and breech reside in, the slots where lengthened by 0.125" one way and .050" the other. This should keep the breech screws from bottoming out when the hammer strikes.
Now to see how far the valve opens it is impossible to see with the naked eye. iphone has a slow-mo feature and it actually worked. One frame caught the valve opening as far as it could at 2000psi. Note the red arrows. Closed and open gaps.
So the valve travels rather far, but will decrease with more PSI in the tank. Least I can move on now to fitting more parts. Still so much to do on the build but will slowly get there. Mounting the barrel will not be easy as a rather thin wall barrel. Have to be careful not to distort the diameter in anyway to jeopardize the projectile traveling through.
Looking forward to actually firing the rifle assembled and complete but still a few months away.
(Edited)
Searched through the posts, here are links to the previous build posts.
[www.airgunrendezvous.com]
[www.airgunrendezvous.com]
[www.airgunrendezvous.com]
[www.airgunrendezvous.com]
Might be more, but all I had time for now.
Thanks for reading.
Pedro G.
Edited 1 time(s). Last edit at 11/02/2019 07:00PM by pedrog.
|
Re: 308 Airgun Build Continues.... slowly (pic heavy) November 04, 2019 10:34PM |
Registered: 12 years ago Posts: 2,189 |
Howdy Pedro
Looks like one step forward....
That’s how R&D goes though right ? Those skid marks look pretty deep too . Your lucky you found time to get back into it too . So many time I start projects and loose parts and never get back into them . Hopefully you can stick with it now that the fun ( testing) part is ahead.
Good luck my friend. I’m excited to see your progress! It looks like a fun time and a lot work.
Thanks
Kurt
|
Re: 308 Airgun Build Continues.... slowly (pic heavy) November 07, 2019 12:20AM |
|
Registered: 14 years ago Posts: 1,097 |
Thanks Kurt,
It is hard to find time. No what winter is creepy in, rather quickly I might add, more time for other things. R & D take time and I am working somewhat blind as I only have the theory or operation from pictures with no measurements.
Hopefully next few weeks will show progress. Need to do some lathe work. A co worker offered the use of his as mine is to small. Need to extend the overall tube by 6.5" as I do not want to shorten the barrel.
Appreciate the comment.
Pedro
|
Re: 308 Airgun Build Continues.... slowly (pic heavy) November 06, 2019 12:10PM |
|
Admin Registered: 15 years ago Posts: 14,038 |
Hello Pedro,
Sorry I haven’t commented yet. Thank you for posting. Especially with all the pictures. I need to study them. I’d have to familiarize myself with their mechanism. I will.
Regarding the screw you made that broke, I can see that your hardening cycle was good. The grain is a smooth soft grey without a “particle” texture. But your tempering cycle wasn’t deep enough. You’d want to draw a screw for that usage to a dark straw color. Just getting some “peacock” colors of light purple/blue speckles among the darker gold background. It’s hard to do with direct heat. Try transfer heat. Set the screws on a small section of steel plate (5/16 - 3/8”) . Heat the plate. Let the heat “soak” into the screws. As it approaches the correct color, remove them from plate and squirt them with WD-40.
We will talk, regarding your barrel mounting concern. I have a procedure I’ll share.
Best,
Gary
|
Re: 308 Airgun Build Continues.... slowly (pic heavy) November 07, 2019 12:28AM |
|
Registered: 14 years ago Posts: 1,097 |
Hi Gary,
No worries about responding, I know you have more important things to do but do appreciate your thoughts.
I did temper the screw twice this last time around. As I continue to build I will make the final screws and do as you suggest, a transfer heat. Chris at Clickspring shows some nice trays he uses for blue finishing his screws, this would work to temper as well.
A few thoughts have come to mind about mounting the barrel. I will try them and see how I make out. The one I am thinking of is an end piece that holds the barrel within the main tube and acts as a muzzle end cap. Barrel would never get past it. Open to suggestions and ready to learn
Thanks for taking time to comment.
Pedro
barnespneumatic Wrote:
-------------------------------------------------------
> Hello Pedro,
>
> Sorry I haven’t commented yet. Thank you for
> posting. Especially with all the pictures. I need
> to study them. I’d have to familiarize myself
> with their mechanism. I will.
>
> Regarding the screw you made that broke, I can see
> that your hardening cycle was good. The grain is a
> smooth soft grey without a “particle” texture.
> But your tempering cycle wasn’t deep enough.
> You’d want to draw a screw for that usage to a
> dark straw color. Just getting some “peacock”
> colors of light purple/blue speckles among the
> darker gold background. It’s hard to do with
> direct heat. Try transfer heat. Set the screws on
> a small section of steel plate (5/16 - 3/8”) .
> Heat the plate. Let the heat “soak” into the
> screws. As it approaches the correct color, remove
> them from plate and squirt them with WD-40.
>
> We will talk, regarding your barrel mounting
> concern. I have a procedure I’ll share.
>
> Best,
> Gary
No worries about responding, I know you have more important things to do but do appreciate your thoughts.
I did temper the screw twice this last time around. As I continue to build I will make the final screws and do as you suggest, a transfer heat. Chris at Clickspring shows some nice trays he uses for blue finishing his screws, this would work to temper as well.
A few thoughts have come to mind about mounting the barrel. I will try them and see how I make out. The one I am thinking of is an end piece that holds the barrel within the main tube and acts as a muzzle end cap. Barrel would never get past it. Open to suggestions and ready to learn

Thanks for taking time to comment.
Pedro
barnespneumatic Wrote:
-------------------------------------------------------
> Hello Pedro,
>
> Sorry I haven’t commented yet. Thank you for
> posting. Especially with all the pictures. I need
> to study them. I’d have to familiarize myself
> with their mechanism. I will.
>
> Regarding the screw you made that broke, I can see
> that your hardening cycle was good. The grain is a
> smooth soft grey without a “particle” texture.
> But your tempering cycle wasn’t deep enough.
> You’d want to draw a screw for that usage to a
> dark straw color. Just getting some “peacock”
> colors of light purple/blue speckles among the
> darker gold background. It’s hard to do with
> direct heat. Try transfer heat. Set the screws on
> a small section of steel plate (5/16 - 3/8”) .
> Heat the plate. Let the heat “soak” into the
> screws. As it approaches the correct color, remove
> them from plate and squirt them with WD-40.
>
> We will talk, regarding your barrel mounting
> concern. I have a procedure I’ll share.
>
> Best,
> Gary
Sorry, only registered users may post in this forum.
Online Users
Guests:
13
Record Number of Users:
4
on March 10, 2022
Record Number of Guests:
234
on February 21, 2021