Home
>
Airgun Rendezvous Main Forum
>
Topic
Re: A few working pics .....
|
A few working pics ..... August 14, 2011 12:14AM |
|
Admin Registered: 15 years ago Posts: 14,038 |
Some pics of working recently. It was slow to get my shop legs back. That last round really hit me hard. But - I'm cooking pretty well now. Also wearing a weight lifting belt for some back support. I was getting tired of my face slamming into the mill carriage when I bent over to aligh a tool cutter with the work pc.  Yet another pc. of kit to strap on and deal with while working. It's bad enough all the darned alarms going off for pills. Yeah, I know, I know .... the pics. hahah.
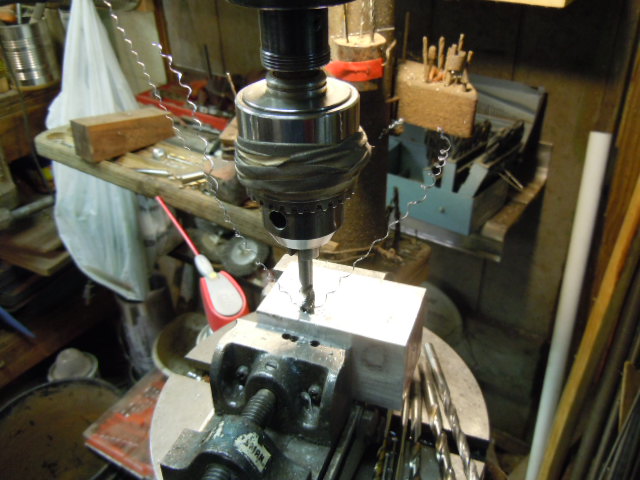
Doing a threading operation on one of the X-Caliber receiver towers.
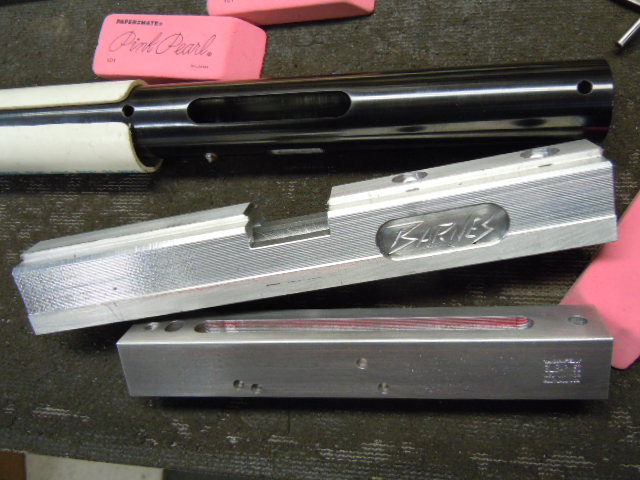
The 32 Magnum I'm doing for the gun room . The milled receiver, the trigger block, and the main blued tube.
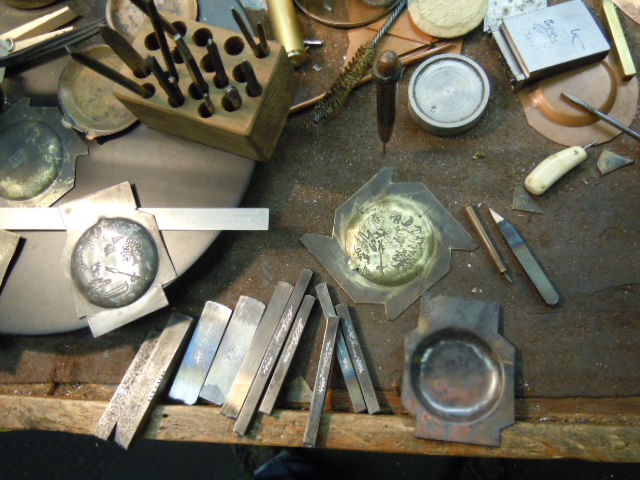
For Rick ... some of the tools used to make your Expedition Case. Each of those punches is hardened tool steel. A design, or a segment of the design, is carved (backwards) into the face of the punch. It's positioned on the prepared metal and struck with a hammer to take an imprint. This artform is called "Stamp Art" and was big in the Victorian Era.
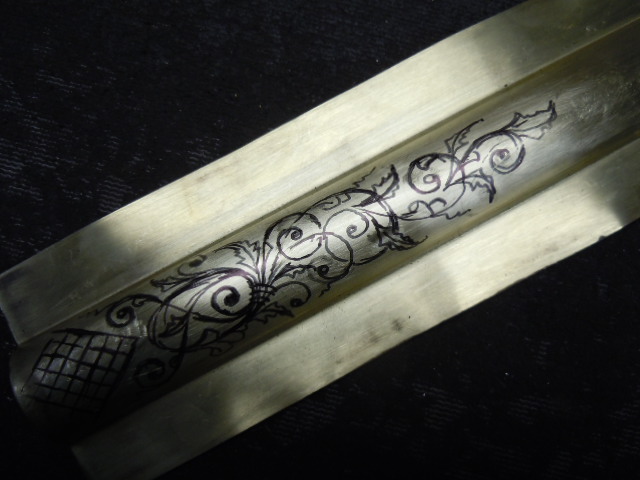
A reservoir dress kit with it's laid out pattern for engraving.
Gary
 Yet another pc. of kit to strap on and deal with while working. It's bad enough all the darned alarms going off for pills. Yeah, I know, I know .... the pics. hahah.
Doing a threading operation on one of the X-Caliber receiver towers.
The 32 Magnum I'm doing for the gun room . The milled receiver, the trigger block, and the main blued tube.
For Rick ... some of the tools used to make your Expedition Case. Each of those punches is hardened tool steel. A design, or a segment of the design, is carved (backwards) into the face of the punch. It's positioned on the prepared metal and struck with a hammer to take an imprint. This artform is called "Stamp Art" and was big in the Victorian Era.
A reservoir dress kit with it's laid out pattern for engraving.
Gary
|
Re: A few working pics ..... August 14, 2011 12:24AM |
Registered: 15 years ago Posts: 234 |
|
Re: A few working pics ..... August 15, 2011 12:30AM |
|
Admin Registered: 15 years ago Posts: 14,038 |
HI Rick,
It's packed. We'll send it Monday if the sky doesn't fall.
Glad you liked the pc. Another thing that's interesting about all my die cutting work, is that 99% of it is done freehand ... and 1 to 1 .... scale. Meaning, it's not done on a pantograph reducing mill as you might suspect. When the mint maked a new quarter, the artist is working on a master the size of a hub cap, and in plaster. Machines then scale down the artwork and do the cutting into steel. When I make these stamps, I'm cutting them backwards, to the scale they are gonna appear, and cutting them into hardened tool steel.
Gary
|
Re: A few working pics ..... August 14, 2011 03:36PM |
Admin Registered: 15 years ago Posts: 1,489 |
Gary,
I like looking at peoples pictures for items that are not the topic of discussion. The tape on the chuck? I also see a tool in the third picture that looks like it has a bone handle(awl? Metal work?). One can only imagine the really great stuff that has been born on that well worn workbench. That workbench picture is kind of Warholish.
The reverse stamping is amazing, can't you just do something simple?
It's a pleasure to come here and watch your business. We get to look through the shop window and watch you work.
Lon
Edited 2 time(s). Last edit at 08/14/2011 03:42PM by Bigbore.
I like looking at peoples pictures for items that are not the topic of discussion. The tape on the chuck? I also see a tool in the third picture that looks like it has a bone handle(awl? Metal work?). One can only imagine the really great stuff that has been born on that well worn workbench. That workbench picture is kind of Warholish.
The reverse stamping is amazing, can't you just do something simple?

It's a pleasure to come here and watch your business. We get to look through the shop window and watch you work.
Lon
Edited 2 time(s). Last edit at 08/14/2011 03:42PM by Bigbore.
|
Re: A few working pics ..... August 14, 2011 07:53PM |
|
Admin Registered: 15 years ago Posts: 14,038 |
Hi Lon,
Hey buddy ... thank you. I was feeling a bit beat up today. You lifted my Spirit.
Started the morning dragging. Went to the shop anyway. First thing I recall is that a power strip blew last night when I was working. I fiddled with it ... left it. That was after the horizontal bandsaw blade broke earlier. And after I'd finally made a tool to drill out a broken off drill bit down inside a machined housing.
So, I get another power strip somebody had given me. A bud had six or eight surplus strips but they had no plugs on them. Good heavy stuff. I went to the cupboard for a male plug end ... it was not to be found. So, I figure I'll use one of the old power cords I've snipped off of dead A/C units. Nice heavy - I'll graft one on. Can't find any. On the way to the house to pillage something ... I found a "squid". A sort of short drop cord with about 6 different tenticle plug pigtails on it. Ah! One good thing.
I go to unplug the old power strip ... and everything comes back on. It's not the power strip ... it's the electrical socket in the steel box. Great. Up under the second story floor joists - tight in a corner over the milling machine. Perfect. So; I could leave it - now that it's working. And then, I could shovel up the ashes of the shop later. Or, I could start dragging tools and rewire the box. I hate shoveling. I start dragging tools.
I go to turn off the electric to that line. I read the Gary tag on the line. #14. But - the tag is 32 years old ... everything has been altered nine times since then. I turn off #14. There's a small extension cord hanging from another box on the line. Instead of climbing the ladder again, I figure I'll just plug something into it to test if it's off. And, a quick ... actually ... make that thorough search of the shop yields NOTHING with a small plug on it that isn't three prong or has the cursed wide blade prong. Fine - back up the ladder. Isn't this fun? hahah. I use a tester ... yep ... it's still hot. So; I go back down and turn off this ... then that ... finally the whole darned town is nearly blacked out. I have a LED gooseneck magnet light zapped to the overhead heat duct. It's actually a neat product for another story. So; of course ... with the whole town blacked out ... I touch the thing with pliers ... and weld them to the terminals ... and hear CLICK ... as the last breaker trips. Ah, it's that one! Evidently some fool hooked together two 110V lines to make a 220V feed for an air compressor. And .... whatever ....
So; during the fun, I backed into a tall shelf full of junk. ... yes ... and the whole thing crashed and fell for about ten minutes. Screws, nails, lighting stuff .... stuff I don't even own and have never seen before ... all created a pile that blocked off a good portion of the shop. Perfect.
And so, the morning has progressed. Fixed it all. Cleaned it up. Showered and changed. And now ... I'm ready to go back in there for another round.
No Lon ... seems I can't do anything simple. hahahah I know what you mean though. hahah. No - the simple stuff never interested me. I usually pick something that's so obscure that nobody even knows how it's done, what it takes, or has seen it enough to even know if they should be impressed. Everybody knows it's hard to high jump six feet. Who knows how Victorian Stamp Art is done, and what it should look like?
Ivory handled tool is a small hinge making tool. The bunch of rubber bands on the chuck provides a friction surface to wind the chuck open and closed with a spin. The thing is slick and polished from 37 years of me stopping the chuck with my hand. I got tired of it slipping thru my hands.
Back later. Glad you enjoy watching Lon. And, I sincerely appreciate that you comment too. That's the part that gives me some company. Was mailing a guy this am. And, we were talking about how he was gonna use his gun when he gets it. I told him I'd figured this forum was going to be the most comforting and rewarding place on earth for me. I was gonna come here and see my stuff being used and enjoyed. See people sharing it and telling stories about their experiences. But, gosh ... who'd want that after making all this stuff. The mystery of everything disappearing into a black hole is far more ... "Out There .. " ;?)
" ;?)
Thanks for your post Lon.
Gary
Edited 1 time(s). Last edit at 08/15/2011 12:26AM by barnespneumatic.
Hey buddy ... thank you. I was feeling a bit beat up today. You lifted my Spirit.
Started the morning dragging. Went to the shop anyway. First thing I recall is that a power strip blew last night when I was working. I fiddled with it ... left it. That was after the horizontal bandsaw blade broke earlier. And after I'd finally made a tool to drill out a broken off drill bit down inside a machined housing.

So, I get another power strip somebody had given me. A bud had six or eight surplus strips but they had no plugs on them. Good heavy stuff. I went to the cupboard for a male plug end ... it was not to be found. So, I figure I'll use one of the old power cords I've snipped off of dead A/C units. Nice heavy - I'll graft one on. Can't find any. On the way to the house to pillage something ... I found a "squid". A sort of short drop cord with about 6 different tenticle plug pigtails on it. Ah! One good thing.
I go to unplug the old power strip ... and everything comes back on. It's not the power strip ... it's the electrical socket in the steel box. Great. Up under the second story floor joists - tight in a corner over the milling machine. Perfect. So; I could leave it - now that it's working. And then, I could shovel up the ashes of the shop later. Or, I could start dragging tools and rewire the box. I hate shoveling. I start dragging tools.
I go to turn off the electric to that line. I read the Gary tag on the line. #14. But - the tag is 32 years old ... everything has been altered nine times since then. I turn off #14. There's a small extension cord hanging from another box on the line. Instead of climbing the ladder again, I figure I'll just plug something into it to test if it's off. And, a quick ... actually ... make that thorough search of the shop yields NOTHING with a small plug on it that isn't three prong or has the cursed wide blade prong. Fine - back up the ladder. Isn't this fun? hahah. I use a tester ... yep ... it's still hot. So; I go back down and turn off this ... then that ... finally the whole darned town is nearly blacked out. I have a LED gooseneck magnet light zapped to the overhead heat duct. It's actually a neat product for another story. So; of course ... with the whole town blacked out ... I touch the thing with pliers ... and weld them to the terminals ... and hear CLICK ... as the last breaker trips. Ah, it's that one! Evidently some fool hooked together two 110V lines to make a 220V feed for an air compressor. And .... whatever ....

So; during the fun, I backed into a tall shelf full of junk. ... yes ... and the whole thing crashed and fell for about ten minutes. Screws, nails, lighting stuff .... stuff I don't even own and have never seen before ... all created a pile that blocked off a good portion of the shop. Perfect.
And so, the morning has progressed. Fixed it all. Cleaned it up. Showered and changed. And now ... I'm ready to go back in there for another round.
No Lon ... seems I can't do anything simple. hahahah I know what you mean though. hahah. No - the simple stuff never interested me. I usually pick something that's so obscure that nobody even knows how it's done, what it takes, or has seen it enough to even know if they should be impressed. Everybody knows it's hard to high jump six feet. Who knows how Victorian Stamp Art is done, and what it should look like?
Ivory handled tool is a small hinge making tool. The bunch of rubber bands on the chuck provides a friction surface to wind the chuck open and closed with a spin. The thing is slick and polished from 37 years of me stopping the chuck with my hand. I got tired of it slipping thru my hands.
Back later. Glad you enjoy watching Lon. And, I sincerely appreciate that you comment too. That's the part that gives me some company. Was mailing a guy this am. And, we were talking about how he was gonna use his gun when he gets it. I told him I'd figured this forum was going to be the most comforting and rewarding place on earth for me. I was gonna come here and see my stuff being used and enjoyed. See people sharing it and telling stories about their experiences. But, gosh ... who'd want that after making all this stuff. The mystery of everything disappearing into a black hole is far more ... "Out There ..
 " ;?)
" ;?)
Thanks for your post Lon.
Gary
Edited 1 time(s). Last edit at 08/15/2011 12:26AM by barnespneumatic.
|
Anonymous User
Re: A few working pics ..... August 14, 2011 11:11PM |
|
Re: A few working pics ..... August 15, 2011 01:56AM |
Registered: 15 years ago Posts: 234 |
|
Re: A few working pics ..... August 15, 2011 03:07AM |
|
Admin Registered: 15 years ago Posts: 14,038 |
Hi Rick,
Hope you got it all repaired and had a good supper.
Takes a lot of maintenance to keep an operation running. Nearly none of it pays a thing, takes your time, and leaves you where you were yesterday .... with nothing new to show for it. Working to make, maintain, and then use your tools ... makes for a full day, doesn't it?
Gary
|
Re: A few working pics ..... August 15, 2011 10:38AM |
Registered: 15 years ago Posts: 438 |
its nice to hear the aarms are working for med .
yes , its not many people who have to make the tools to start to make the things they make for work.
imagine if an office worker had to make the pencil they needed.
and thats in the most simple case , everyone else , just look at the tools you use at work every day , and imagine the time thought and effort in making them , before you start to do anything.
but , when people read bespoke , how many of us actually think about what it actually means.
|
Re: A few working pics ..... August 15, 2011 02:41PM |
|
Admin Registered: 15 years ago Posts: 14,038 |
Thanks Tom,
Hey - it strikes people either one or two ways. It's either intensely interesting ... or else I'm a jerk. One or the other.
I built my shop. I mixed the concrete floor. Built the building. Installed the sewer line - put in the bathroom, plumbed the shop. Wired the shop for electricity. Hundreds of 110 and 220 boxes. Installed the hot air oil furnace. That was just to have a shell to keep the rain out, and have some warmth. Then I started making specific tools I required. A list would go on for a few pages.
Once all that was there, I had to know what to do. I've spent the last fifty years teaching myself to figure out what I need to do a task, and how to make the tools needed to make the final product. It's the "attention span" that is the key thing everybody is always trying to figure out. "How's he DO that stuff?" And, usually they're looking for some special how-to book or tape that I wandered into. You think about a flat area of "dirt" ... and then you build a working shop there ... accumulate all the tools ... and learn how to use them .... and you have one mighty long attention span.
As I say ... it either really adds to the story of my guns, or it's just me bragging.
Thanks Tom,
Gary
|
Re: A few working pics ..... August 15, 2011 08:13PM |
Registered: 15 years ago Posts: 234 |
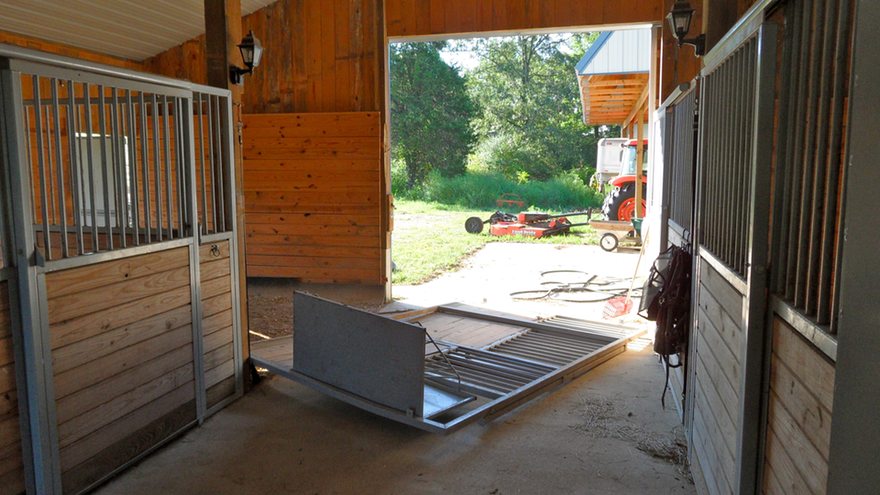
Here is a Picture of the event..I have it stood up now ( it's pretty Heavy ), now have to figure out how to repair the 4x4..I was told NO thru bolts to the outside wall. The Metal is Galvanized & i am NOT a Welder anyway. At least i have Time on my side. Only need 4 stalls till next April.! 
It does make one truly appreciate just what you accomplish Every Day.!
Rick G.

It does make one truly appreciate just what you accomplish Every Day.!
Rick G.
|
Re: A few working pics ..... August 15, 2011 08:56PM |
|
Admin Registered: 15 years ago Posts: 14,038 |
Hello Rick,
Scarf in a new pc. of wood with marine glue. It will be stronger than new.
Use a very rough belt sander to remove the damage and then slope it out from each end, so you end up with a longish curved void. You just want it to be a smooth arc such that you can bend a wooden yard stick into and have it touch all along the curve. Now, you need the graft material. Use the same type of wood as the 4 by 4. If the damage is more than about 1/2" deep, then just plan on using two layers or more of graft material. They need to be flexible enough to bend into the arc and touch all along. (You'll use some screws to put the graft layers into place).
I'd actually suggest some softer screws - soft iron or even brass. Reason being is that it's guaranteed that wherever you need to put your stall mounts back in there, you would hit anything hard .... like dry wall screws. Don't use those.
So, you get this glue. Usually a powder - usually dark brown when mixed. Might be called "casine" or some such. Just use a marine grade of stuff. I'm sure a two part epoxy would do it ... but the work time would be a bummer.
So - you mix the glue, and bend and screw in the laminate grafts. Make sure you have enough wood to cover the damage. Let it all dry. You saw off the protruding ends and glue mess after the glue dries.
They've made boat masts this way forever. Trust me.
Good Luck Rick, (This forum will self-destruct .... in time .... hahaha)
Gary
Scarf in a new pc. of wood with marine glue. It will be stronger than new.
Use a very rough belt sander to remove the damage and then slope it out from each end, so you end up with a longish curved void. You just want it to be a smooth arc such that you can bend a wooden yard stick into and have it touch all along the curve. Now, you need the graft material. Use the same type of wood as the 4 by 4. If the damage is more than about 1/2" deep, then just plan on using two layers or more of graft material. They need to be flexible enough to bend into the arc and touch all along. (You'll use some screws to put the graft layers into place).
I'd actually suggest some softer screws - soft iron or even brass. Reason being is that it's guaranteed that wherever you need to put your stall mounts back in there, you would hit anything hard .... like dry wall screws. Don't use those.
So, you get this glue. Usually a powder - usually dark brown when mixed. Might be called "casine" or some such. Just use a marine grade of stuff. I'm sure a two part epoxy would do it ... but the work time would be a bummer.
So - you mix the glue, and bend and screw in the laminate grafts. Make sure you have enough wood to cover the damage. Let it all dry. You saw off the protruding ends and glue mess after the glue dries.
They've made boat masts this way forever. Trust me.

Good Luck Rick, (This forum will self-destruct .... in time .... hahaha)
Gary
|
Re: A few working pics ..... August 16, 2011 07:01PM |
|
Admin Registered: 15 years ago Posts: 14,038 |
|
Re: A few working pics ..... August 16, 2011 05:26AM |
Registered: 15 years ago Posts: 294 |
|
Re: A few working pics ..... August 16, 2011 08:00AM |
Registered: 15 years ago Posts: 2,524 |
|
Re: A few working pics ..... August 16, 2011 09:35AM |
Registered: 15 years ago Posts: 438 |
|
Re: A few working pics ..... August 16, 2011 09:36AM |
Registered: 15 years ago Posts: 438 |
|
Re: A few working pics ..... August 16, 2011 03:13PM |
Registered: 15 years ago Posts: 234 |
Wow,
Thanks for the Tip Gary, i knew i was going to have to fix the 4x4 somehow.
i believe they may even have a few cut off ends lying around here somewhere.
Seems a local Severe Thunderstorm took down half a tree not far from the Barn, & i think That's what spooked the Mare. So now i also have to clean up That mess.
STILL not a bad as what you have to go thru to correct a small "accident" as it were.
Rick G.
|
Anonymous User
Re: A few working pics ..... August 17, 2011 02:00AM |
|
Re: A few working pics ..... September 10, 2011 03:35PM |
Registered: 15 years ago Posts: 68 |
Sorry, only registered users may post in this forum.
Online Users
Guests:
15
Record Number of Users:
4
on March 10, 2022
Record Number of Guests:
234
on February 21, 2021

